Visual navigation
Having learnt how to fly an aircraft, and cope with emergencies and abnormalities, the teaching of navigation brings the student to the point of using the aircraft to travel somewhere. It brings together much of what has already been learned into the context of a cross-country flight, where the student learns not only how to fly but also how to manage a flight. It is in this phase of training that a student’s ability to build and maintain situational awareness, assess differing conditions and situations, and make good decisions needs to “step up” to a higher level. In this sense, it is much more than navigation training, and the instructor needs to make sure they emphasise these non-technical skills whilst teaching through this phase.
Visual navigation is a time-based activity, supported by map reading, and its success is dependent on good time management. There are many tasks for a pilot to remember and carry out, and good workload management is essential. A major emphasis the instructor must impart during navigation training is that of managing time and planning moments where specific tasks can be accomplished. A workflow or “routine” needs to be taught, based around a timescale.
Whilst technology in the cockpit brings many advantages and enhancements to flight safety it is imperative that the basics of visual navigation are thoroughly taught, using dead-reckoning techniques, supported by use of a paper chart. Instructors may find their students resistant to learning these basics when the technology is so good and will need to provide strong reasoning as to the importance of learning the basics first. There are two reasons for this;
Navigation is much more than simple map-reading, and this navigation section to the FI Guide refers to the guide Practical Flying Guide 1 - Visual Navigation.
The techniques recommended in the guide are thoroughly explained and are not repeated here. To understand the intent of the lessons, the techniques to be taught, and the briefings in this section, it is essential the instructor is familiar with the guide.
Before embarking on the navigation phase of training, there are some essential elements of learning which need to have been achieved. Whilst the student’s skill in these areas may not be perfect, or complete, the basic principles and techniques need to have been well grasped.
Prior to the navigation phase the student must be able to climb the aircraft, whilst maintaining a heading to an altitude, level off and trim for straight and level flight. An ability to maintain the heading and altitude whilst ‘in trim’ will be essential, and without these basic skills, attempting to learn navigation will be frustrating or even counter-productive.
The navigation phase, should not be the first time that a student has identified their position, or estimated a direction to head in, on an aeronautical chart or map. In fact, the basic skills of map reading should have been instilled through the early lessons.
The ability to use a chart should be introduced in small steps from the very first lesson. Initially pointing out key landmarks in the local area and relating them to their depiction on the chart. On subsequent lessons, teach the student to hold the chart “track up” as well as pointing out airspace boundaries. When teaching climbing and descending, introduce the vertical aspects of navigation by checking airspace altitudes and planning a climb or descent accordingly. In pre-flight briefings, always tell the student where the lesson will be conducted and point it out on the chart. Refer again to the chart during the debriefing, reviewing where the aircraft had been.
At the end of each lesson, where a join will be necessary, a discussion can take place between instructor and student as to their present position with direct reference to the chart. Key features to assist in finding the airfield can be identified and followed. Airspace can be identified and in the later lessons, a heading and distance can be estimated. Bear in mind that the student’s estimates will be somewhat wayward to begin, but with the experience built up through practice, they will be building the skill and knowledge needed for navigating and cross-country flights.
The use of the radio should be phased in over the early lessons, with limited exposure during the initial exercises building up to the student taking more responsibility as the training progresses. By the end of the circuit phase the student should be dealing with all the communications prior to leaving the circuit and after joining. Competency with the calls necessary for departing and joining the circuit, as well as changing frequencies should quickly follow thereafter. It is all too easy for the instructor to make the joining call on completion of each lesson, especially when the frequency is busy, and time is pressing to get back for the next lesson. In some circumstances this is the correct course of action, but whenever possible the student should be encouraged to make the R/T call(s).
During the post circuit training (such as Advanced Turning or Forced Landings) instructors should teach their students how to make an accurate position report. They should also teach how to contact FISCOM (or another suitable station) to obtain information such as an Area QNH, a NOTAM, or a METAR.
Instructors should be gradually introducing the use and interpretation of the AIP, the Supplements and NOTAMs. It is important to keep this very simple to start with, to avoid over-whelming the student. But, like map reading, make small steps progressively building up knowledge.
At an early stage take the time to teach how to assess the suitability of the weather from the available weather information. Teach the principle of assessing the ‘big picture’ of weather and asking the question such as is the weather expected to improve, remain stable or deteriorate? How will the weather be towards the end of the flight? Teach the comparison of a TAF with actual conditions experienced so and by ‘looking out of the window’. Relate visibility to the distance of a nearby visible feature. Encourage the student to check the forecast weather before each lesson and, with some help, compare that with actual conditions particularly as it relates to a Go/No go decision.
In-flight teach the student to make reasonable assessments of cloud base, visibility and wind at typical cruising altitudes. Their initial attempts may not be very accurate, but will improve rapidly with experience, provided you remember to include it during the lesson.
Threat and Error Management (TEM) techniques should be discussed from the outset of the training course, with the practical application of the techniques demonstrated and practised throughout the early lessons.
Whilst the student pilot will have thoroughly studied navigation for the purpose of passing the theory examination, a comprehensive ground course will need to be delivered to apply those principles in a practical sense before airborne navigation training commences.
Appendix 1 provides a suggested syllabus for a typical ground course and is based on the techniques depicted in the guide Practical Flying Guide 1 - Visual Navigation. This list can be used or adapted as required to take account of the local environment. The content of the ground course would take at least a whole day to deliver but could be spread over several briefings.
As previously stated, this navigation section of the Flight Instructor Guide assumes the use of the techniques described in the guide Practical Flying Guide 1 - Visual Navigation. As such it can be used as a reference text for students to understand and learn these techniques.
It is well worth encouraging students to thoroughly learn or even over-learn, the techniques and “rules of thumb” from the guide, on the ground. This would include WHAT checks, track error estimation, standard closing angle calculations, practising the free hand drawing of track lines, estimating the degrees in True, and converting to Magnetic.
The material and guidance to instructors offered in this section should be used alongside the requirements stipulated in AC61-3, and the FTSG PPL Cross-Country Demonstration of Competency. The lessons complement the ‘stages’ described in the AC as shown in the table below.
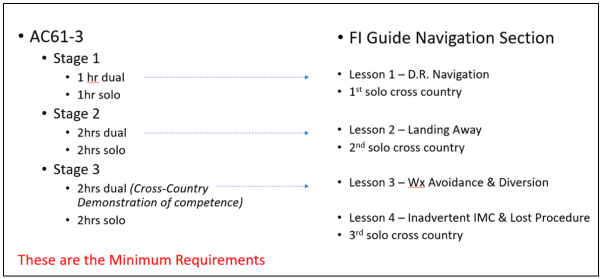
Included in Lesson 4 is the recovery from an inadvertent entry into IMC. This is an additional and optional item to those listed in the AC and is recommended as a safety enhancement.
The variables of aircraft type, student ability, local airspace considerations and weather patterns will ultimately dictate the construction of each flight lesson and the exact order of events.
Therefore Lessons 1 to 4 provided in this section are templates designed to be adjusted as appropriate to accommodate differences in operating environment. Ideally Lesson 1 should be a triangular route with 20-minute legs but can be adjusted if required. The remaining lessons should be adjusted to suit the training location. For instance, a relatively long flight may be required to reach a controlled aerodrome, or terrain may influence a route and individual legs. It may be more suitable to have 3 lessons, or even 5 lessons rather than 4. When making such adjustments it is important to ensure that the techniques are taught in a logical sequence and that enough time is available on each leg to prevent the student from becoming over-loaded. Equally, the whiteboard briefing must be adjusted to represent the actual route to be flown.
Routes to be planned by the student, should be determined by the instructor to ensure that they are suitable for teaching the techniques during a dual flight, and for safe practice and consolidation during solo flights.
Solo flights must be integrated with the dual flights in a similar manner to the Stages of the AC.
Equipment used in the cockpit should be well managed and kept to a minimum. Using the techniques of the Practical Flying Guide 1 - Visual Navigation, the only equipment that needs to be ‘to hand’ is the chart, a pen or pencil, a time piece and a navigation log. All other equipment such as a circular slide rule, a protractor or navigation ruler are for planning on the ground and should be stowed.
This is the first flight in the navigation phase and lays the foundational methods and techniques which will be built upon in further lessons. The instructor needs to focus on three areas in this lesson; flight planning, DR navigation and workload management within defined time frames.
To ensure the integrity of the taught exercise, unlike other lessons, the instructor should not introduce deliberate errors. Instead fly accurately and allow errors, changes in the wind for example, to present themselves naturally. And then correct these using the appropriate techniques.
[For full details of the techniques used refer to: Practical Flying Guide 1 - Visual Navigation.]
Before the day of the flight, the instructor should have given the student a simple triangular route to plan that will take approximately one hour, each leg covering approximately 20 minutes of flight time at normal cruising speed.
On the day of the flight ask the student to check and interpret the AIP, supplements and NOTAMs as applicable. They should also check and assess the suitability of the weather conditions. They can then complete their planning but will probably need help with this. Their navigation log and chart or map should be prepared as per the Visual Navigation guide and the instructor should check this and point out any corrections that may be needed. Even if the school has a flight following system installed in the aircraft, the student should still be taught how to file a VFR Flight Plan.
The final stage of the planning process is to review the route, identifying, or ideally refreshing from the chart what might be seen at each of the fixes and turning points so that there is an awareness of what to expect prior to getting airborne. This is the time to identify potential threats (e.g. lowering cloud, changes of wind, danger areas, likely traffic, circuit or instrument traffic at aerodromes) and human errors (e.g. misreading headings or times, airspace boundaries including altitude changes) and discuss error prevention and mitigation (checking danger area status, radio calls, gross error checks and WHAT checks).
Workload will be high when learning to navigate. The structured and time-based approach to navigating will help in distributing tasks and managing workload.
Self-discipline needs to be applied to achieve accurate flying, particularly in holding a heading. Guesswork must be resisted, and the heading only changed, when properly re-calculated.
Care must be taken to avoid becoming too absorbed in the navigating alone, but to ensure other important tasks are being attended to, such as lookout, radio calls and cruise checks.
Regular cruise checks need to be integrated using time as a prompt into the overall workload management of the flight.
The alignment of the Direction Indicator (DI) must be checked frequently. The DI should also be checked after a Turning Point as a large change of heading can lead to the DI being out of alignment.
During a cross country flight, where the aircraft is in the cruise configuration for most of the time, it is appropriate to lean the mixture for performance and economy. Remaining fuel and endurance should also be noted in the Fuel Log section of the Navigation Log.
Always maintain a thorough lookout. Avoid too much time “head down” by determining when to put away the map and concentrate on flying and looking outside of the aircraft. When looking at the map, hold it up so that peripheral vision outside, is maintained.
The student can suffer from a strong tendency toward confirmation bias, particularly when identifying a key feature to confirm their position, i.e.; “seeing what they want to see”. To prevent this, teach them not to accept the feature until it is properly identified using it’s “distinguishing features”.
The student may sometimes feel uncomfortable in not being certain of the aircraft position. Using the method of TIME – MAP – GROUND, should establish approximate position and dispel such discomfort.
The student should pre-flight the aircraft, start up, taxi and complete run ups and take-off checks.
Prior to take off, the initial stage of the flight should be reviewed or briefed, including circuit departure, visual references, speeds, airspace and altitudes. The student conducts the take-off and initial climb and then the instructor should take control and teach how to correctly identify the Start Point (SP), reading from map to ground. The instructor should position the aircraft over the SP at the planned altitude, speed and on heading, and ask the student to take note of the time overhead. Having established the aircraft straight and level, in trim and on track, teach the gross error check. Orientate the map to “track up” and compare features on the ground with the track drawn on the chart. Ideally use features straight ahead and in the distance. Then teach the WHAT check:
Stow the map and hand over control to the student to fly straight and level. This is an important step as it demonstrates to the student that the map is not required all the time during navigation, and that there is no need to follow progress with a finger on the chart. Point out the time available till the first fix and suggest a task that fits within this time frame, such as a cruise check. Emphasise that during this period the student should have capacity, to lookout and maintain situational awareness, such as weather conditions or traffic in the area.
Not less than 2 minutes before the first fix, take control and teach how to fix the position of the aircraft. Emphasise TIME – MAP – GROUND and then using “large to small”, “lead in” and “distinguishing” features identify the fix and establish the aircraft position. Mark this on the map and teach how to correct for any error in track and time. Begin by considering why the error exists. If it’s due to the wind, then teach correcting for track error by calculating a new heading. Then apply Standard Closing Angle (SCA) to regain the track. In the same way teach for any error in time using the Proportional Technique. Write down the new heading or ETA in the Navigation Log, if these have been changed.
Teach the method for correcting heading or time on an opportunity basis. Do not artificially induce an error.
Point out the time available till the second fix, stow the map and hand over control to the student to fly straight and level, and suggest another task that fits within the time frame, such as an appropriate radio call. Make sure the student has had an opportunity to contact FISCOM. In this flight it could be as simple as obtaining the Area QNH or amending the SARTIME.
With 2 minutes to run to the second fix, take control and repeat the process of identifying the fix, establishing aircraft position and making corrections where necessary, noting this down on the Navigation Log. Then hand control back to the student, point out the time available to the turning point (TP) and suggest another task within the time frame.
With approximately 2 minutes to run to the TP, take control and teach the actions to identify the TP and execute the turn onto the next leg so that the aircraft is overhead the TP and on the next heading. The student can carry out a gross error check, followed by the WHAT check. Make it clear to the student that this is the same routine as was completed at the SP. Developing these workflows and routines are an essential part of the navigation training.
Essentially, during the first leg navigation tasks are completed by the instructor while flying, with the student only handling the controls during the straight and level portions of the cruise. A common instructor error is to leave the student in control whilst teaching the navigation elements. This will quickly lead to the student being over-whelmed and the instruction being in-effective. It is vital the student can give their full attention to the navigation instruction being given.
During the second leg the same workflows are used, with time being the prompt to instigate the next actions. The emphasis now changes with the student given practice in managing time and completing the navigation tasks (position fixing, calculating corrections to heading and ETA, and amending the Navigation Log), whilst the instructor flies the aircraft. Again, the exception is the portions of the leg when the map is stowed, during which the student should be in control. At the end of the second leg, the student should be able to carry out the procedures at the TP whilst retaining control of the aircraft.
For the final leg, the student will have been taught all the necessary workflows and routines to complete the leg from both a navigation and flying perspective, so should be tasked both to fly and navigate. However, the student may still require some assistance, particularly with any corrections at the fixes. Avoid multiple prompts, but instead try to give the student the opportunity to practise, only intervening if it seems the purpose of the leg will be lost. As this is the final leg of the flight, during portions when the map is stowed, you might suggest the student reviews and briefs the arrival and join, if their capacity allows.
Having navigated on the third leg, the aircraft should be close enough to the aerodrome to allow the student to organise the join, enter the circuit and land. To prove the accuracy of the student’s estimate for the field, it may be useful, if appropriate, to join overhead. This would then provide an ideal opportunity to practice a Standard Overhead Join.