Instrument flying
Flying VFR at night is inherently more risky than flying VFR during the day. These risks and threats can, and must, be managed carefully with good preparation and instrument flight currency.
A student's night flying ability will not be assessed by an examiner, so it's important that the instructor uses the night flying instructional time to ensure the student is aware of the issues and is competent at night flying.
To operate the aircraft safely both on the ground and in the air at night.
Night is defined as the time between the end of evening civil twilight and the beginning of morning civil twilight. These times are published in AIP New Zealand GEN 2.7 Daylight Tables, and are dependent on location and the time of year.
Discuss the following legal requirements for night flying: Aerodrome and aircraft lighting requirements, VFR night minimas for controlled (1500 feet/5 km) and uncontrolled (1500 feet/8 km), including the prerequisites below.
Students must have completed at least two hours instrument flight time, which includes the following instrument flight manoeuvres, before they may undertake night flight training:
PPL night flying requirements: two hours dual, two hours solo, five hours total.
Light-sensitive nerves, called cones and rods, are located at the back of the eye. The cones are located in the centre of the retina, and the rods are concentrated in a ring around the cones.

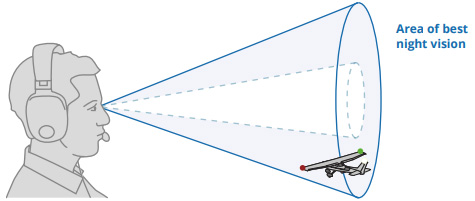
Figure 1 In low light, central vision doesn't work as well
Cones detect colour, details and faraway objects.
Rods are used when something is seen out of the corner of the eye, ie, for peripheral vision. They detect objects, particularly those that are moving, but do not give detail or colour. Rods make night vision possible. Because the rods are distributed in a band around the cones and do not lie directly behind the pupil, off-centre viewing (looking to one side of an object) is important during night flight.
In low light, central vision doesn't work as well, so peripheral vision is relied on. As peripheral vision is good at noticing changes, objects are more likely to be noticed at night with peripheral vision (see Figure 1).
Central vision is still required to read instruments or charts, but it's important to preserve as much function in peripheral vision as possible. In order to achieve this, allow time for the eyes to adapt to the dark, avoid bright light by keeping cockpit lights and torches as dim as possible, and use a practised scanning motion when looking outside the aeroplane.
Allow time to adjust to low light after completing any tasks that need to take place in bright light, such as the preflight inspection. The rods become fully effective after approximately 30 minutes, so avoid any bright light once dark adaption has started.
Be aware that mobile phones can have very bright displays.
A careful lookout on the ground and in the air is critical. It's very easy to lose sight of other aircraft lights as they merge with background lights.
Speed perception is very difficult at night, and it's common to find the taxi speed building up without noticing it. Consciously taxi slower than normal.
Transfer to instruments quickly after take-off. The horizon will probably not be visible, so attitude, speed and direction must be maintained with reference to the aeroplane's instruments.
The student should already be familiar with the illusions they may experience when instrument flying. These will still be present at night.
In addition, the following illusions can be experienced at night:
For the preflight check, a torch will be required, in particular a torch powerful enough to be able to see the detail required. A headband torch can be useful.
While carrying out the preflight, note the position of the aeroplane on the aerodrome and the position of other aircraft.
It's also advisable to wear a high visibility jacket, and to be conscious of personal safety.
All lights should be checked to ensure they are working, including but not limited to: navigation lights, anti-collision lights, strobe lights, taxi lights, and landing lights. The pilot should also be familiar with the lights operation, how much can be seen with them and when they are used.
Internal aeroplane lighting, including the compass, must be operational and the pilot should know how to adjust the lighting levels.
The pilot's personal night equipment should include:
It's important to know the location of the controls and switches, so the pilot can operate them without needing to look at them. At this stage of their training, the student should be familiar with the aeroplane.
AIP Vol 4 aerodrome charts operational data details the lighting available on the aerodrome – a thorough knowledge of lighting facilities is important.
Discuss the location, colour, and if applicable, the direction of all aerodrome lighting, including: apron, taxi, holding point, runway, and approach lighting. If pilot activated lighting (PAL) is available discuss the operation of this.
Review ATC light signals.
Discuss the particular approach lighting available at the aerodrome, and how it's to be used, eg, PAPI. Check that the student can decode the lighting codes, and they know where to find the decodes for those they cannot.
Inadvertent IMC is more likely at night. Exercise extreme caution. It can be very difficult to recognise weather deterioration and extremely hard to determine if cloud is blocking the view of terrain.
At night there is less mixing in the air up to 2000 feet and the surface wind will lessen and back. This can also mean the surface wind is significantly different from the wind at circuit altitude.
When the night is overcast, it will be much harder to identify cloud than it would be on a clear night.
Pay particular attention to the temperature/dew point relationship as an indicator of potential fog and low cloud.
Detail the procedures to carry out in the event of the following emergencies:
See the Night VFR GAP booklet for further information.
Preflight in the light if possible, otherwise use a good torch.
Correct use of taxi/landing lights and strobe light.
Consider the number of other aircraft in the circuit, as it can be hard to see them at night.
Caution – illusions as discussed above.
Fly above the 'minimum elevation figure'. This can be determined from the MEF figures on the VNCs.
Identify local landmarks and lighting patterns – if any disappear, such as a neighbouring community – there is a strong likelihood of cloud or fog development.
More frequent SADIE checks.
Particular attention should be paid to dew on windscreens and frost on wings.
Cockpit layout familiarity.
Trust the instruments.
Instrument flying illusions will be present.
Night vision factors – 10/30 minute adaptation, health (I'MSAFE), importance of oxygen to brain and eye function, colour perception, depth perception, focus (cones and rods), focal length (myopia), black hole, lights and stars.
Taxi slowly.
Recognise runway lighting position in peripheral vision as this is the landing perspective.
When lining up, make sure to have a careful lookout for aircraft on the approach.
During take-off, use the runway lighting to keep on the centreline, because a reference point in the distance may not be available.
Once airborne immediately transfer to instruments to establish the aeroplane attitude and speed, and a positive rate of climb.
When established in the climb, a combination of instruments and visual reference can be used.
The first circuit should be a familiarisation circuit. It's a chance to see the local area, and compare how it looks at night to how it looks in the day. It's also a chance to orientate and locate local landmarks and townships.
At night it can be difficult to see the runway lighting from the downwind position. Care must be taken positioning the aeroplane downwind at the correct spacing.
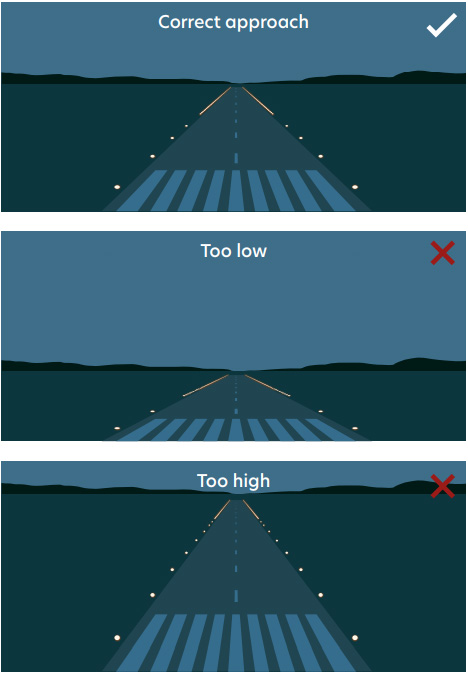
At night the runway edge lights must be used to judge the approach perspective (see Figure 2).

Figure 2 At night, use the runway edge lights to judge the approach perspective
During the landing, it's important to use the runway perspective to judge the roundout and flare, not look for the ground in the landing light. The first few landings should be completed without the landing light.
Be careful of too much speed when turning off the runway.
Teach night taxi principles, and application factors such as: apron, runway, and light recognition.
Take off and vacate the circuit to familiarise the student with the different night perspective, including: black hole effect, lack of depth perception, other illusions, speed and direction of other aircraft, and above all, the importance of lookout.
Return to the circuit and carry out approach and low overshoots to view the runway lighting perspectives of too low, on profile, and too high.
Conduct night circuits, progressively introducing various emergencies.
Night flying whiteboard layout [PDF 96 KB]
Revised 2023