Advanced manoeuvres
This exercise discusses the procedure to follow in the event of needing to land somewhere other than a recognised aerodrome for the reasons discussed below.
It differs from the forced landing because the aircraft has power and it's possible to choose the most appropriate landing site for the circumstances.
If, due to a lack of situational awareness and/or poor flight planning, the pilot becomes hopelessly lost, is running out of fuel or daylight, or is forced to fly in conditions of poor and deteriorating visibility, they may need to consider landing anywhere suitable.
If for any reason pilots find themselves in this situation, they should accept the mistake – and not make another one by pushing on.
The decision to make a landing off-aerodrome will create considerable stress. However, the longer the landing is put off, the more limited the options.
Avoid this whole situation by careful pre-flight planning and by choosing to turn back or divert early.
To learn the procedure to adopt in the event of an off-aerodrome landing.
The reasons an off-aerodrome landing may be required are discussed, with particular emphasis on recognising approaching threats early to avoid these situations.
Pushing on into deteriorating weather is the most common cause, and is the easiest to avoid.
Avoid this situation by setting personal meteorological minima well above the legal minimum. Have a careful consideration of the weather before any flight, and always have an escape plan. See the VFR Met GAP booklet for more strategies.
Becoming hopelessly lost would not necessarily require the implementation of this procedure, but it's considered here in conjunction with one or more of the other reasons.
Becoming lost is avoided by maintaining situational awareness and careful pre-flight planning.
Running out of fuel, which may result from becoming lost or trying to get around weather, rather than diverting early, is a situation that will heighten any existing stress levels.
Careful pre-flight planning and in-flight fuel monitoring will help avoid this situation.
Most organisations require all aeroplanes to be on the ground, or in the circuit, 30 minutes before Evening Civil Twilight (ECT). Plan to start early and avoid ECT issues.
If any of the above situations have developed, the recommended procedure is to adopt the poor visibility configuration and carry out an off-aerodrome landing. To execute the recommended procedure may take about 15 to 20 minutes, so a timely decision to avoid additional stress is recommended.
Making an early decision to land gives more time available to make the plan.
Continued wind awareness.
The appropriate passenger briefing and security checks are carried out.
In the real situation make a PAN call and squawk 7700. If the outcome doesn't look favourable you may wish to make a MAYDAY call (refer CFI). Consider activating the ELT.
As with all low flying, more frequent use of SADIE checks is advised.
The minimum descent altitude for this exercise is restated (refer CFI).
Consider the poor visibility configuration to slow things down and allow for the increased stress. If the landing is because of bad weather, carburettor heat needs to be considered. If it's due to a low fuel state, manage the landing within the available fuel.
When flying at low level or in reduced visibility, disorientation can quickly occur. The student will need to make an enhanced effort to remain orientated.
Stress has a significant effect on decision making, situational awareness, mental workload, problem solving, and performance. Minimising stress involves good aviation practice to avoid the situations that call for this procedure, overlearning the procedure to deal with it, and applying effective stress management techniques.
This exercise is carried out in the low flying zone, unless this is over water. The low flying zone pre-entry checks and radio calls are made. If the exercise is to be simulated by maintaining 500 feet AGL outside the low flying zone, amend the briefing as required.
Descending to 500 feet AGL simulates a lowering cloud base and reduced visibility. The poor visibility configuration is adopted, and the decision to land off-aerodrome is simulated.
With the decision made to discontinue the flight, a search for a suitable landing site is initiated, the emergency is declared, and the passengers and cabin secured.
Assessment of the wind is based on the same indicators as the forced landing, with the importance of drift increased.
Revise the 'seven S's, C and E': size, shape, slope, surface, surrounds, stock, sun, communication and elevation. Power will be used to maintain an estimated height above ground level, but avoid operating unnecessarily low, as this will only increase stress levels.
If time permits, a suitable landing site with ground assistance nearby can be chosen.
The position of the sun may be a major factor in the choice of a suitable landing site, especially if the onset of ECT is the reason for landing.
The length of the landing site can be assessed by flying into wind, from fence to fence in the direction of landing and timing how long it takes. Two knots is equal to approximately 1 metre/second. Assuming the airspeed is 70 knots, then groundspeed is about 70 knots. If the time it takes to fly the length of the landing site is 10 seconds at 70 knots, then that is approximately equal to 350 metres. If the basic landing distance is known the landing site can be assessed as suitable or not.
Alternatively superimposing a known and acceptable image over the selected site such as "looks about the distance between the threshold markers and the 500-foot markers of the home aerodrome", ie, 150 metres.
Once a landing site into wind has been selected for closer inspection, flying overhead at right angles to the landing option/vector can help determine if a left or right hand circuit is the best option (see Figure 1). It will also confirm the wind assessment through drift, and provide an opportunity to look at the approach and overshoot paths before any descent. It may also provide cues to help identify any gradient.
In low cloudbase situations, it's recommended that the circuit altitude be established at about 100 feet below the cloud base. This provides both maximum visibility and ground clearance.
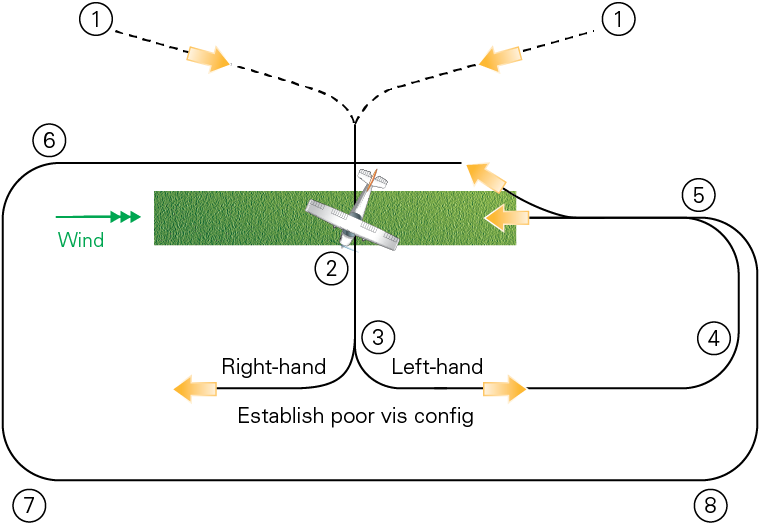
Figure 1 Pattern for a precautionary landing
(See whiteboard layout [PDF 161 KB] for key to numbers.)
Ideally, the aeroplane is positioned into wind at 500 feet AGL, with the chosen landing site on the left-hand side, far enough out so the pilot can look across at the landing site and assess it in relation to the 'seven S's, C and E'.
On this and subsequent legs, the chosen landing site is assessed in relation to the 'seven S's, C and E', with particular emphasis on surrounds in the approach and climb-out areas.
Landmarks are chosen (if available) at the beginning and end of each circuit leg to help remain orientated in case the pilot loses sight of the landing site.
In addition, on the first upwind leg, the heading of the landing direction can be noted. To reduce mental workload, however, another less common method is to align the DI to north while on this leg, regardless of actual heading. Each leg of the required circuit will now have a cardinal heading in nil wind and the landing will always be carried out on a heading of north.
This, however, may contribute to overall disorientation. The important focus is on the chosen landing area and noting of relevant threats.
On the downwind leg, spacing is assessed using the same airframe reference as a normal circuit. Since the short field landing technique will be used, the downwind leg is extended – visibility permitting.
At the end of the downwind leg, a ground feature (if available) is selected as a turning point reference.
Assuming the chosen landing site appears suitable up to this point, a second inspection is carried out at a minimum of 200 feet AGL.
The base leg is extended through the centreline and the aeroplane turned into wind, with the landing site on the left-hand side, but closer than during the first inspection. This inspection is to decide exactly which side or part of the landing site will be used for the landing roll. Are there any tree stumps in the long grass?
Established on and parallel to final, a gradual descent to a minimum of 200 feet AGL is carried out.
Descent below 200 feet AGL is not recommended, because it takes considerable concentration to fly the aeroplane level and look at the landing site surface. Also, there is a possibility of unseen obstructions, and since a climb to 500 feet AGL will be initiated on completion of this inspection, the climb is minimised. Unless committed to the landing, never descend below the highest obstacle in the go-around path.
The major portion of the aeroplane's momentum will be spent in the first two thirds of the landing roll. Therefore, it's generally recommended that the low-level inspection is not prolonged, but a climb to 500 feet AGL initiated about two thirds of the way along the landing site (refer CFI).
Ensure the decision points for the approach and aim point are easily identifiable because, unlike a forced landing, time to go around in the event of a poorly executed approach should be available.
Climb out in the poor visibility configuration to 500 feet AGL. Generally, this climb-out is not treated as a go-around with appropriate configuration changes, because re-establishing the poor visibility configuration on reaching 500 feet AGL increases the workload.
The aeroplane is re-established on the downwind leg, the passenger briefing is completed, and a short field approach and landing is carried out.
During the landing roll, use braking as required, avoid major obstacles and above all else, keep the cabin intact.
After landing, the shutdown checklist is completed.
The student should be capable of positioning the aeroplane within the low flying zone, checks complete at 500 feet AGL, and established in the poor visibility configuration.
To inject some realism to this exercise talk the student through the scenario. The weather has deteriorated, they are not entirely sure of their position, and it's starting to get dark – they need to carry out a precautionary landing.
First they must find a suitable landing site. Have the student talk you through what they are looking for, while you fly the aeroplane. They should remember the 'seven S's, C and E' from previous lessons and the briefing.
Take some time to discuss all of the elements. Although a time constraint may be introduced in later flights, allow the student enough time to complete the recommended inspections.
Now set the aeroplane up in the pattern. Choose the landmarks, note the heading of the landing direction, descend to 200 feet for the closer inspection, and time the downwind leg to calculate landing distance available.
Consider the decision making points for the approach and aim point. If they are not achieved a go-around will need to be executed to reposition for another approach.
Continue the circuit and set it up to land. The height at which you execute a go-around will be determined by your CFI.
Now let the student practise, while you monitor their progress.
Re-emphasise to the student that this is a last resort procedure, and the best course of action is not to get themselves in this position in the first place.
Precautionary landing whiteboard layout [PDF 161 KB]
Revised 2023