Circuit training
This lesson teaches the student to land the aeroplane without engine power. Initially, this is taught as part of the circuit lessons, but is equally important in the forced landing without power lessons.
From a position of about 1000 feet AGL downwind, the students must be able to reach the 1/3 aim point, preferably without flap. Once a landing is assured various methods are used to reduce the L/D ratio and increase the rate of descent so as to touch down as near to the threshold as practical.
To complete a landing without engine power from the 1000 foot downwind position.
There are a number of factors that will affect the ability of the aeroplane to reach the 1/3 aim point. Once it is assured that the aeroplane will reach the 1/3 aim point, the aim point is moved towards the landing threshold, generally by applying flap, so as to use all the available landing distance.
As this exercise will be practised on the home aerodrome, the student should be encouraged to initially aim 1/3 of the way into the runway. Once they are more proficient, the distance available can be progressively reduced by requiring them to stop before an arbitrary point on the runway.
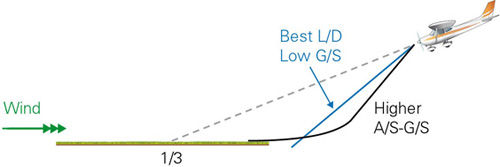
If it becomes apparent that a stronger than expected headwind on final is causing the aeroplane to undershoot (aim point moves up the windscreen), it may be necessary to lower the aeroplane's nose and increase the airspeed. This will increase the groundspeed, allowing the aeroplane to better penetrate into the wind. This is one of the reasons for aiming 1/3 into the field and delaying flap (see Figure 1).

Figure 1 Headwind on final
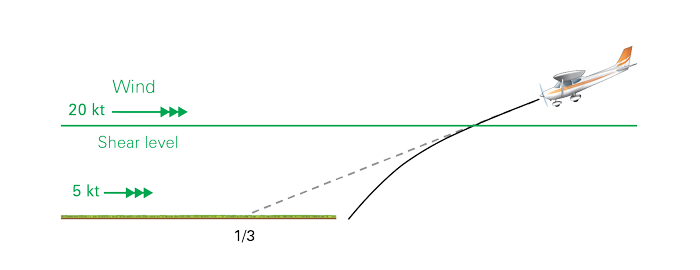
The only method of countering windshear when no power is available is to increase airspeed. Aiming 1/3 of the way into the field provides a buffer against this eventuality and is also another reason for delaying the use of flap (see Figure 2).

Figure 2 Windshear on final
Assuming that the 1/3 aim point can be easily reached from about 500 feet AGL, the L/D ratio is reduced by:
Flaps are the first option for increasing the rate and angle of descent, because they increase the drag very effectively.
Increasing the airspeed is recommended, by relaxing backpressure, not by pushing the control column forward. This method, however, is not particularly effective when used on its own.
When combined with flap, only a small increase in airspeed will be required to dramatically increase the rate of descent. However, the increase in airspeed means the aeroplane will float in the round-out, so if it is used, it should be used early rather than late. After round-out the airspeed will rapidly dissipate due to the high drag produced by the flap.
An S-turn not only increases the total distance to touch down, but also decreases the L/D ratio, as a result of the increased drag generated in the turn. In the modern low-drag training aeroplane this method is not particularly effective.
It should be noted that excessive use of S-turns indicates poor judgement and a poor forced landing plan. It should not be used as a standard manoeuvre, but as a compensation for a judgement error. Most commonly an S-turn is used when the final track has been overshot and some height needs to be lost.
A sideslip is an unbalanced manoeuvre, where the controls are 'crossed'. For example, right aileron is applied in conjunction with left rudder to prevent the turn or to keep straight.
Due to the comparative ineffectiveness of the rudder in most modern training aeroplane types, full rudder will be required to keep straight, even in a relatively shallow banked sideslip.
Once again, in the modern low-drag light aeroplanes, this manoeuvre is not particularly effective unless it is combined with the use of flap.
Some aeroplanes have a restriction against sideslipping with flap down (refer Flight Manual). This is generally because the flap blankets the tailplane in a sideslip, destroying the airflow over the tailplane. In most cases, where the tailplane normally provides a down load this results in an abrupt nose-down pitch and total elevator ineffectiveness. Although the pitch down ceases when the rudder is centralised (sideslip is stopped); this is an undesirable characteristic, especially near the ground.
If this manoeuvre is not restricted, it is vital that airspeed is increased or at least maintained. If the aeroplane were permitted to stall in this configuration (controls crossed) a spin is almost inevitable.
If sideslipping with flap is permitted, the resulting rate of descent is usually very impressive. When the student first sees the ground rushing up, there is a tendency to increase backpressure to arrest the high sink rate rather than decrease the amount of rudder being used. Therefore, if this manoeuvre is to be used it should be taught at altitude before this lesson (refer CFI). It is also more appropriate to use sideslip in the base leg rather than when close to the ground.
The factors affecting rate of descent should also be applied in the above order, flap first, then increase airspeed, so that a safe margin over the stall speed is maintained during the following manoeuvres, then S-turn or sideslip.
This is only a simulation and the safety of the aeroplane and crew are paramount. Therefore, power should be used at any time the safety of the aeroplane is in doubt, or on the "go-around" instruction.
Glide approach practice must, however, be treated with some seriousness and the importance of a successful outcome stressed.
Plan the glide approach practice with consideration for other traffic, as the exercise does not entitle you to right of way. At controlled aerodromes, it may be appropriate to request a "glide approach" so that ATC can sequence following traffic.
The effects of up-slope and down-slope on approach judgement are discussed.
Consistent with good aviation practice, no passengers should be carried during glide approach practice.
Whenever the engine is at idle the carburettor heat should be HOT.
Visual limitations in relation to optic flow rates and depth perception, as a result of the high descent rates are discussed.
Confirm spacing and configure the aeroplane late downwind. Reduce power, maintain height, apply carburettor heat early, and trim in preparation for the glide attitude.
In the 1000-foot area abeam the threshold, confirm the throttle is fully closed and the base turn started, considering factors discussed above to achieve 1/3 aim point.
The approach is judged by reference to the 1/3 aim point, down to about 500 feet AGL. At this point the question is asked, "Can the 1/3 aim point be easily reached?".
| Yes | No |
| Manoeuvres to reduce the L/D ratio are applied where necessary in sequence and combined to modify the touchdown point. | Delay the application of flap until the answer is a positive yes. |
Nothing new in here, just perfecting ground operations.
Use the full length of the runway available as it makes the demonstration of how easily height can be lost (but not regained) much clearer.
For most aerodromes, choosing an aim point 1/3 into the field will result in the aeroplane being excessively high in relation to the threshold.
This is the whole point of the 1/3 aim point. There is no possibility of the aeroplane being flown through the first fence. When the chosen landing site is shorter, the 1/3 aim point is still 1/3 of whatever length is available, and the possibility of flying through the first fence remains constant. Only the possibility of overrunning the far end of the landing site increases.
From this excessively high position, most or all of the various methods of increasing the rate of descent can be demonstrated.
Once the forced landing lessons have been completed, more realistic field lengths can be simulated by restricting the amount of runway available, for example, from the threshold to the 300-metre (1000-foot) markers. In this case the 1/3 aim point will be about 100 metres in, and only those manoeuvres that are required (in sequence) will be used to modify the actual touchdown point.
The countering of strong headwinds and windshear, by maintaining the 1/3 aim point to about 500 feet AGL and then increasing airspeed, are demonstrated and experienced when conditions permit.
If the aeroplane is low, or more commonly high or fast at the threshold, and the ability to make a safe landing is in any doubt whatsoever – carry out a go-around. During the subsequent go-around, remind the student that maximum braking was still an option (if it would have stopped the aircraft in the space available). Do not put the aeroplane in a position where maximum braking has to be used during a simulation.
Although during an actual forced landing the aeroplane may be forced onto the ground so as to apply maximum braking, during the simulation a normal landing is carried out with brakes as required.
Let the student know that there will be lots more practice of this manoeuvre and will serve to complete the forced landing lessons.
Glide approach whiteboard layout [PDF 437 KB]
Revised 2023